
Day12です!
今日もがんばっていきましょー!
読んでいただいている方、いつもありがとうございます!
初心者なもので、たまに間違った内容もあるかと思います。
その際にはコメントやTwitterでご指摘いただけると幸いです!
[Day12]第十章10.3〜10.5作業ログ
今日はユーザー一覧のページとユーザーの削除
今日はユーザー一覧のページとユーザーの削除機能をつけます。
ユーザーの削除は管理者のみが行えるように設計します。
indexページでユーザー一覧を表示
users_controller.rbのindexアクションでユーザー情報を所得。
class UsersController < ApplicationController
  before_action :logged_in_user, only: [:index, :edit, :update]
  ...
  def index
    @users = User.all
  end
  ...
end
また、ユーザー一覧はログイン済みのユーザーしか見られないようにしたいので、before_actionのところに、indexアクションも追加してます。
index.html.erbでは、eachを使ってユーザーを表示する。
<% provide(:title, 'All users') %>
<h1>All users</h1>
<ul class="users">
  <% @users.each do |user| %>
    <li>
      <%= gravatar_for user, size: 50 %>
      <%= link_to user.name, user %>
    </li>
  <% end %>
</ul>
ユーザーを一気に作成するツールの作成
テストや動作チェックのためにユーザーをたくさん作りたい場合があります。
そこで、大量のユーザーを一気に作成したりするのに、便利なgemがあります。
gem 'faker', '1.7.3'というgemをインストールします。
このfakerをRubyスクリプトやRailsタスクとも呼ばれる、Rubyコードを実行できるファイルから実行してみます。
標準では、Railsはdb/seeds.rbというRubyスクリプトを使うそうです。
User.create!(name:  "Example User",
             email: "example@railstutorial.org",
             password:              "foobar",
             password_confirmation: "foobar")
99.times do |n|
  name  = Faker::Name.name
  email = "example-#{n+1}@railstutorial.org"
  password = "password"
  User.create!(name:  name,
               email: email,
               password:              password,
               password_confirmation: password)
endデータベースのリセット:rails db:migrate:reset
Railsスクリプトの実行:rails db:seed
これらを実行してあげると、ユーザーが大量に作成される。
ページネーションの設定
記事を複数ページとかに分割する時に使うのが、ページネーションという機能。
今回はユーザー一覧のページで使ってみます。
実際の導入は超簡単。
まずは、gemのインストール。
gem 'will_paginate', '3.1.6'
gem 'bootstrap-will_paginate', '1.0.0'
やることはあと2つ。
まずは、さっきのindex.html.erbをちょっと変えてあげるだけ。
<% provide(:title, 'All users') %>
<h1>All users</h1>
<%= will_paginate %>
<ul class="users">
  <% @users.each do |user| %>
    <li>
      <%= gravatar_for user, size: 50 %>
      <%= link_to user.name, user %>
    </li>
  <% end %>
</ul>
<%= will_paginate %>
このwill_paginateメソッドは少々不思議なことに、usersビューのコードの中から@usersオブジェクトを自動的に見つけ出し、それから他のページにアクセスするためのページネーションリンクを作成しています。
だそう。
あとは、paginateメソッドに見つけてもらえるように、indexアクションをちょっと書き換えるだけ。
class UsersController < ApplicationController
  before_action :logged_in_user, only: [:index, :edit, :update]
  ...
  def index
    @users = User.paginate(page: params[:page])
  end
  ...
end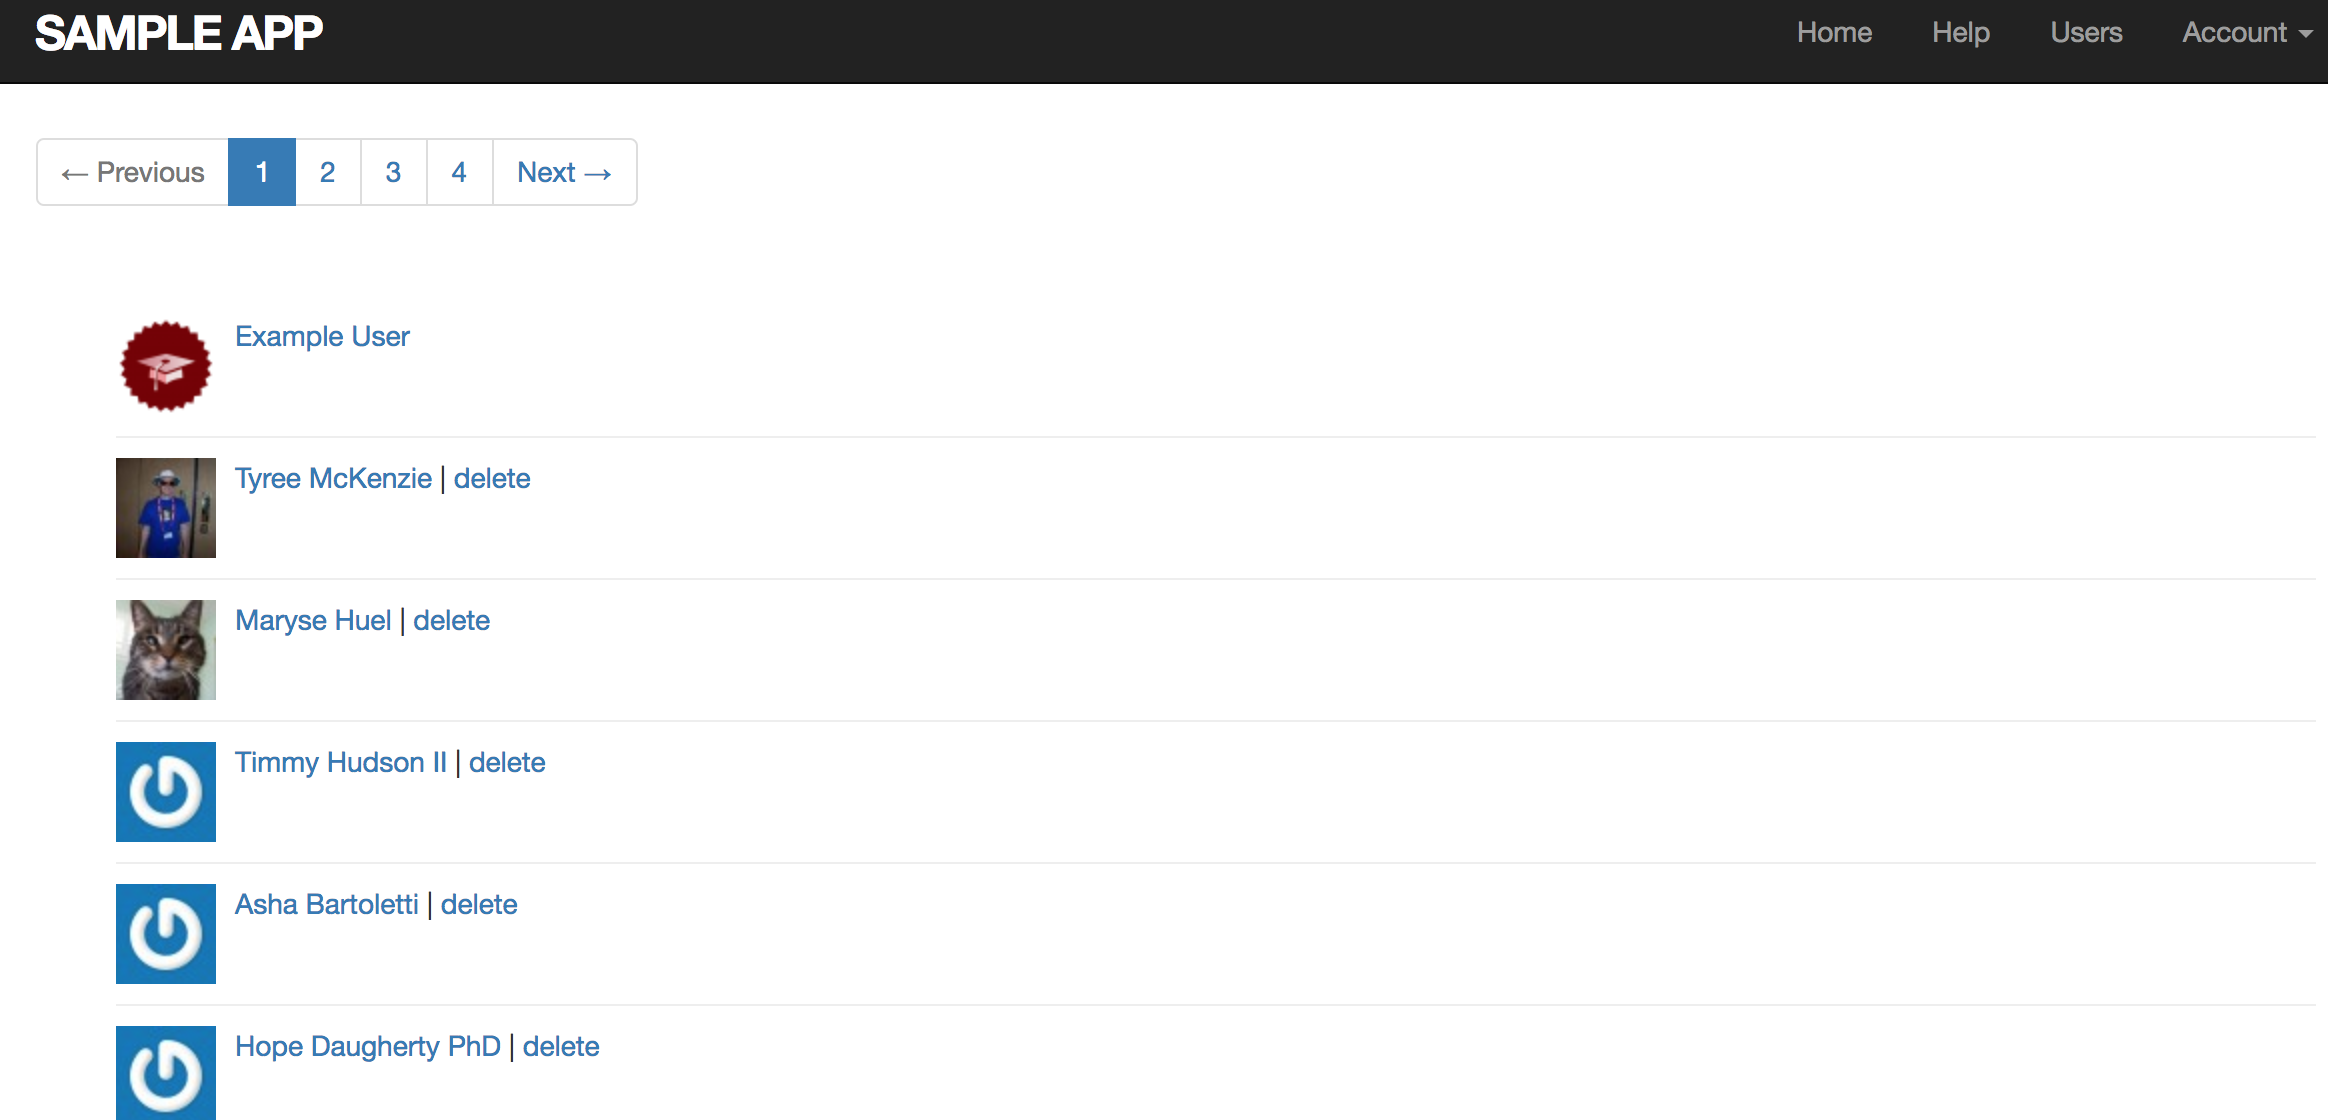
ユーザーの削除機能の実装
最後はユーザーの削除ができるようにします。
管理者のみが行えるように設計する。
管理者かどうか判別できるように、Userモデルにadminカラムを追加。
rails generate migration add_admin_to_users admin:boolean
rails db:migrate
ユーザー1を管理者に仮置きし(admin属性にtrueをいれる)、ユーザー一覧のページに削除用リンクを設置。
<%= gravatar_for user, size: 50 %>
  <%= link_to user.name, user %>
  <% if current_user.admin? && !current_user?(user) %>
    | <%= link_to "delete", user, method: :delete,
                                  data: { confirm: "You sure?" } %>
  <% end %>
※本当のチュートリアルでは、パーシャルを盛り込んでいたのでちょっと違うけど、簡単のため上みたいな感じで。
最後はdestroyアクションの設定。
class UsersController < ApplicationController before_action :logged_in_user, only: [:index, :edit, :update, :destroy] before_action :correct_user, only: [:edit, :update] before_action :admin_user, only: :destroy... def destroy User.find(params[:id]).destroy flash[:success] = "User deleted" redirect_to users_url end private # 管理者かどうか確認 def admin_user redirect_to(root_url) unless current_user.admin? end ...
endこちらもだれでも行えたらだめなので、ログインしていない時、管理者ではない時はbefore_actionではじいてあげます。
[第十章]タケシなりの演習の回答
レイアウトにあるすべてのリンクに対して統合テストを書いてみましょう。ログイン済みユーザーとそうでないユーザーのそれぞれに対して、正しい振る舞いを考えてください。
require 'test_helper'
class SiteLayoutTest < ActionDispatch::IntegrationTest
  test "layout links" do
    get root_path
    assert_select "a[href=?]", root_path, count: 2
    assert_select "a[href=?]", help_path
    assert_select "a[href=?]", login_path
    log_in_as(@user)
    get root_path
    assert_template 'static_pages/home'
    assert_select "a[href=?]", root_path, count: 2
    assert_select "a[href=?]", help_path
    assert_select "a[href=?]", about_path
    assert_select "a[href=?]", contact_path
    assert_select "a[href=?]", "http://news.railstutorial.org/"
    assert_select "a[href=?]", user_path(@user)
    assert_select "a[href=?]", edit_user_path(@user)
    assert_select "a[href=?]", logout_path
    get contact_path
    assert_select "title", full_title("Contact")
    get signup_path
    assert_select "title", full_title("Sign up")
  end
end
先ほどの演習課題で取得したpaginationオブジェクトは、何クラスでしょうか? また、User.allのクラスとどこが違うでしょうか? 比較してみてください。
結果は同じUser::ActiveRecord_Relationでした。間違ってる?
>> User.paginate(page: 1).class
=> User::ActiveRecord_Relation
>> User.paginate(page: 1).class.superclass
=> ActiveRecord::Relation
>> User.paginate(page: 1).class.superclass.superclass
=> Object
>> User.all.class
=> User::ActiveRecord_Relation
>> User.all.class.superclass
=> ActiveRecord::Relation
>> User.all.class.superclass.superclass
=> Object
第十一章11.1〜11.1.2作業ログ
今回のテーマはアカウントの有効化
なにかの会員登録したら、メールアドレスで本心認証したりしますよね。
あの機能が今回勉強できる!
あの認証の流れはこうらしい。
- ユーザーの初期状態は「有効化されていない」(unactivated) にしておく。
- ユーザー登録が行われたときに、有効化トークンと、それに対応する有効化ダイジェストを生成する。
- 有効化ダイジェストはデータベースに保存しておき、有効化トークンはメールアドレスと一緒に、ユーザーに送信する有効化用メールのリンクに仕込んでおく3。
- ユーザーがメールのリンクをクリックしたら、アプリケーションはメールアドレスをキーにしてユーザーを探し、データベース内に保存しておいた有効化ダイジェストと比較することでトークンを認証する。
- ユーザーを認証できたら、ユーザーのステータスを「有効化されていない」から「有効化済み」(activated) に変更する。
新しくコントローラーを作成、ルーティングの設定
rails generate controller AccountActivations
Rails.application.routes.draw do
root 'static_pages#home'
get '/help', to: 'static_pages#help'
get '/about', to: 'static_pages#about'
get '/contact', to: 'static_pages#contact'
get '/signup', to: 'users#new'
get '/login', to: 'sessions#new'
post '/login', to: 'sessions#create'
delete '/logout', to: 'sessions#destroy'
resources :users
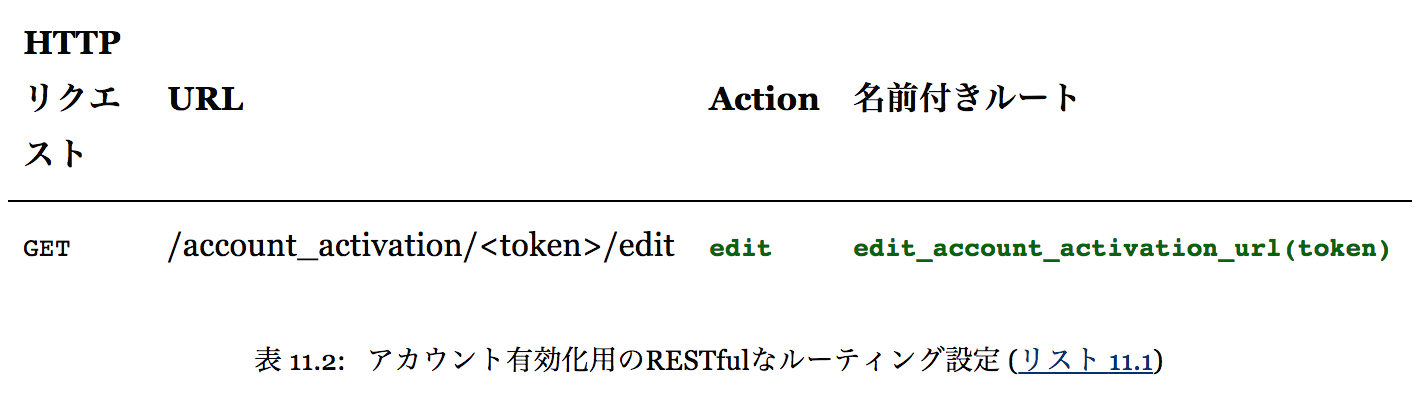
resources :account_activations, only: [:edit]
endこのルーティングによって、以下の名前付きルートなどが使えるようになります。
Userモデルに属性を追加
はじめに書いたように、有効化トークンを発行して、有効化トークンで認証して、有効状態にするという流れを実現するために、Userモデルに属性を追加。
具体的には、この3つ。
- activation_digest(有効化トークンのdigest後)
- activated(有効かどうか)
- activated_at:datetimeの3つ。
最後の認証した時間は今回は使用しないけど、一応ってことで。
rails generate migration add_activation_to_users activation_digest:string activated:boolean activated_at:datetime
rails db:migrate
Activationトークンのコールバック
ユーザーが新しい登録を完了するためには必ずアカウントの有効化が必要になるのですから、有効化トークンや有効化ダイジェストはユーザーオブジェクトが作成される前に作成しておく必要があります。
ここがちょっとわからない。
activatedされていないユーザーを作成してから、有効化トークンを作成すればよくない?と思ってしまった。
とりあえずは、
今回は、オブジェクトが作成されたときだけコールバックを呼び出したいのです。それ以外のときには呼び出したくないのです。そこでbefore_createコールバックが必要になります。
らしいので、コールバックを設定してあげる。
before_create :create_activation_digest
こんなコードで書ける。(emailを小文字にするところもメソッド参照型に変わった。)
class User < ApplicationRecord
  attr_accessor :remember_token, :activation_token
  before_save   :downcase_email
  before_create :create_activation_digest
  validates :name,  presence: true, length: { maximum: 50 }
  ...
  private
    # メールアドレスをすべて小文字にする
    def downcase_email
      self.email = email.downcase
    end
    # 有効化トークンとダイジェストを作成および代入する
    def create_activation_digest
      self.activation_token  = User.new_token
      self.activation_digest = User.digest(activation_token)
    end
end
[第十一章]タケシなりの演習の回答
[Day12]まとめ
- 学習範囲:10.3〜11.1.2
- 学習時間:4時間40分
- 総学習時間:51時間
- 反省点:集中力が今日は続きにくかった。演習問題に時間を取られすぎた。
- 備考:11.1.2のActivationトークンのコールバックのところよくわからん。
読んでいただいている方、いつもありがとうございます!
初心者なもので、たまに間違った内容もあるかと思います。
その際にはコメントやTwitterでご指摘いただけると幸いです!


コメントを残す